How to Paint Over Dark Walls Without a 5-Coat Marathon
Painting over dark walls — the navy bedroom, the charcoal accent wall, the rental's hunter-green dining room — is the home-improvement task most likely to spiral into a five-coat marathon. It doesn't have to. The fastest path uses tinted primer to do most of the color work before the topcoat ever opens, cutting the sequence down to three or four coats instead of five or six. This guide breaks down the decision by scenario, the science of why dark walls resist light paint, the 50% tinting rule, an eight-step procedure, the four common failures, and the time and cost trade-off.
Knowing how to paint over dark walls is mostly knowing one trick — tinted primer — and then doing the four-hour recoat windows patiently. The trick collapses a sequence that takes five or six coats without primer down to three or four with it. The math, the science, and the procedure are all backed by major manufacturer guidance from Sherwin-Williams, Benjamin Moore via primer brand families like KILZ, the Bob Vila reference library, and trade-painter documentation from Five Star Painting. The SudoTool paint coverage calculator handles the gallons math once you've decided on the coat sequence.
This walkthrough covers six things: the scenario-by-scenario decision matrix, the hide and bleed-through mechanisms that make dark walls difficult, the tinted primer trick and the 50% rule that controls it, the eight-step procedure from prep to final cure, the four common failure patterns and their fixes, and the time-and-cost trade-off between skipping primer and using tinted primer correctly.
How to Paint Over Dark Walls: The Decision Matrix
Painting over dark walls isn't one scenario — it's a small set of related scenarios with different coat requirements. The right coat sequence depends on the new color's lightness relative to the base, the pigment family of the base color, and the specific dark color involved. Five Star Painting's trade guide on difficult colors states the headline directly: "Red, black, and dark greens and blues are all hard colors to paint over." The four colors named are difficult for partly different reasons — covered in the next section — but the practical implication is the same: dark base needs a planned coat sequence, not improvisation.
| Scenario | Primer | Topcoats | Total coats |
|---|---|---|---|
| Same-color touch-up (scratches, scuffs) | None | 1 (spot) | 1 |
| Dark over dark (navy → charcoal) | Optional sealer | 2 | 2-3 |
| Dark over similar tone (charcoal → graphite) | Optional | 2 | 2-3 |
| Light over dark (white → navy) | Sealer recommended | 2-3 | 3-4 |
| Dark over light (navy → white) | Tinted, required | 2 | 3-4 |
| Very dark over very light (black → pale) | Tinted, plus possible extra | 2-3 | 4 |
| Red or orange accent → other color | Stain-blocker required | 2 | 3-4 |
The hardest scenario, and the one most homeowners face, is the bottom rows: dark over light and red-accent removal. Those are where the tinted primer trick saves the most time. The easier rows — same-color touch-ups, dark over dark — are covered for completeness, but the rest of this article focuses on the dark-to-light transition that drives most of the search for "how to paint over dark walls."
Why Dark Walls Resist Light Paint (The Hide and Bleed Story)
Light paint over dark walls fails through three different mechanisms working at the same time. They're easy to confuse because the visible result is the same — dark color showing through — but the fixes are different, which is why a single extra coat often doesn't solve the problem.
Mechanism 1: hide power imbalance. A paint's hide is its ability to obscure the base surface. White and pastel paints start from a so-called clear base — a base with relatively little titanium dioxide (TiO2), the white opacifier that does most of the chemical work of hiding. Rutile-phase TiO2 has a high refractive index, around 2.6 to 2.7 per the Diebold (2004) coatings literature, which is why it scatters and reflects light efficiently and is the dominant white pigment in paint. Light colors keep most of that clear base intact so the added colorant can stay vivid, but the result is a topcoat with less hide power than a deep color. Dark paints, by contrast, contain absorbent pigments — carbon black, dark phthalocyanines, iron oxides — that absorb light and hide a base surface in a single coat. The asymmetry is built into pigment chemistry: dark hides easily, light does not.
Mechanism 2: pigment bleed-through. This is a different problem from hide. Some intense pigments don't just resist being covered — they migrate up through subsequent acrylic layers. Five Star Painting breaks the bleed-through tendency down by color family: "Red and orange: Vibrant shades like crimson or fire engine red contain strong pigments that tend to bleed through subsequent layers." And: "Black, blue, and green: Darker shades like navy blue and hunter green feature intense pigments that can resist coverage." The bleed-through pattern is especially visible days after the topcoat dries: a fresh white wall develops faint pinkish or orange patches as red pigments migrate, or shows shadowy blue blotches over navy. The fix isn't more topcoat — that just adds more material the pigment can migrate into. The fix is a sealing primer below.
Mechanism 3: dry film thickness shortfall. Industry painter documentation from RW Pro Painting notes that interior latex paint is engineered to perform at roughly 3-4 mils of dry film thickness — the manufacturer-intended baseline — while a single coat typically delivers only around 1.5 mils. Painting a dark wall with a single coat of light topcoat fails on both fronts: hide is too weak, and the film isn't thick enough to mask the difference. The two-coat manufacturer-standard sequence brings the film up to specification, but it doesn't replace the hide and bleed-through fixes that need to happen below the topcoat.
Combined, the three mechanisms explain why dark-to-light transitions are the case where painters skip primer most and regret it most. The remaining sections focus on the single tool that addresses all three: tinted primer.
The Tinted Primer Trick: The 50% Rule
Tinted primer means a primer that's been color-shifted at the paint counter toward the new topcoat. The mechanism is simple: instead of the topcoat doing all the chromatic work from a stark white base, the primer does much of it first. The topcoat finishes the job in one or two coats instead of three or four.
The industry-standard tinting ceiling comes from Bob Vila's primer reference: "Primer imbued with the shade of your new paint is helpful when making dramatic changes, such as dark to light or vice versa, as it brings the wall color closer to that of the new hue." Most paint counters will tint a primer "up to 50 percent of the new shade" — that's the practical maximum. Beyond 50 percent, the primer no longer functions reliably as a sealing and adhesion layer.
The lighter-than-topcoat rule is non-negotiable. KILZ's manufacturer guidance on tinting primer states: "It is recommended to tint to a lighter shade than the topcoat color." The rule has two reasons. First, primers are formulated with binder-and-pigment ratios that protect their sealing function; aggressive tinting throws those off and degrades adhesion. Second, if the primer ends up darker than the topcoat, the topcoat has to hide the primer in addition to anything below — exactly the problem you were trying to avoid. KILZ flags tinted primer as especially valuable for two cases: "if painting dark, deep, and rich colors or going from darker shade to a lighter one". Painting over dark walls toward a lighter color is the second of those.
Sherwin-Williams's Color Prime System is a useful industry example of the gray-primer variant of this approach: "The Sherwin-Williams exclusive Color Prime System is a continuum of gray shades that starts at light gray (P1) and gradually deepens to P6, or the darkest gray." Sherwin-Williams designed the system primarily for color-accuracy of light or subtle topcoats — "about 20 percent of the colors in the Sherwin-Williams COLOR® system are maximized when applied over a gray-tinted basecoat" — rather than specifically for hiding dark base walls. The mechanism, in SW's own words: "A primer tinted to the recommended shade of gray creates the ideal balance of light absorption and scattering to achieve the correct color in fewer coats." The outcome — fewer topcoats — is the same as the dark-base case, even though the chromatic reasoning differs slightly. A contractor quoted in Sherwin-Williams's documentation reports the time saving directly: "In the past, it often would take us three coats to get the color right." After adopting the gray-tinted primer system, the same contractor was able to "obtain the same quality results in just two coats." One coat saved is a meaningful chunk of a project day, especially when each coat requires its own four-hour recoat window.
How to apply the 50% rule at the paint counter. There are three workable requests, all of which produce a primer in the right zone:
- "Tint this primer to 50% of [topcoat color chip]." The Bob Vila standard request — explicit and what most counters expect.
- "Tint this primer with the P-code on the back of [topcoat color chip]." Sherwin-Williams-specific; the P1-P6 codes encode the recommended gray for that topcoat. Only some colors have a P-code printed.
- "Tint this primer with a gray that matches the topcoat's lightness." Works at any counter and any brand. The most generally applicable phrasing.
For red and orange bleed-through risk, the request changes: you want a stain-blocker primer, often shellac- or oil-based rather than acrylic, because the binder chemistry seals against pigment migration. The tint can be the same, but the base product is different. A standard tinted acrylic primer alone doesn't reliably block red bleed-through.
Step-by-Step: How to Paint Over Dark Walls
The full sequence is eight steps. The recoat windows assume modern latex (water-based) paint, which covers essentially the entire interior-paint market today. Oil-based paints have longer recoat windows; check the can label.
- Surface cleaning. Trisodium phosphate (TSP) or a mild detergent solution removes dust, grease, smoke residue, and anything else that would interfere with adhesion. Rinse with clean water and let the wall dry for twelve to twenty-four hours.
- Deglossing on shiny surfaces. If the existing wall is semi-gloss or high-gloss, the new primer won't adhere reliably. Use a chemical deglosser or scuff-sand with 220-grit paper. Wipe down again with a tack cloth or damp lint-free rag.
- Patch repairs. Fill nail holes, dents, and small dings with spackle. Sand smooth with 220-grit after drying. Spot-prime each repair before the full primer coats — bare spackle absorbs paint very differently from the surrounding wall.
- Order tinted primer. Bring the topcoat color chip to the paint counter and request the tinting using one of the three phrasings above. For red or orange base walls, specify stain-blocker primer; otherwise a standard acrylic primer is fine. Most interior primers — KILZ 2, Zinsser Bullseye 1-2-3, Sherwin-Williams Multi-Purpose — accept tinting within the 50% ceiling.
- Primer coat #1. Roll a thin, even coat, keeping a wet edge to prevent lap marks. Glidden's manufacturer drying-time guide specifies safe recoat at four hours for typical latex; high humidity can extend that meaningfully — when in doubt, wait longer. The first primer coat will look streaky over the dark base; that's expected and not a sign of a problem.
- Primer coat #2. Bob Vila's specific guidance for dark-to-light transitions: "Apply two thin coats of either a white primer or a tinted primer that matches the new paint hue." The second primer coat is what makes the dark-to-light path predictable. Skipping it is the single most common failure mode (covered in the next section). Same four-hour recoat window.
- Topcoat #1. First coat of the finish paint. Apply thin and even. The primer should have done enough chromatic work that the first topcoat looks close to final; minor unevenness is normal.
- Topcoat #2 and cure. The second topcoat establishes the final dry film thickness and the manufacturer's specified performance level. The paint is touch-dry within an hour or two but reaches full cure over seven to fourteen days. Light contact and basic occupancy resume after 24 hours; wiping or cleaning the painted surface should wait until full cure. Finish choice also affects cleanability — covered in our eggshell vs satin vs semi-gloss guide.
The cumulative time from first surface-prep step to fully-cured wall is two to three days for the active work, plus the longer cure window before heavy use. That's longer than a quick weekend paint job — but considerably shorter than the alternative.
What Goes Wrong: Common Failures (and Fixes)
Four patterns repeat in dark-to-light projects. Recognizing them in advance is faster than discovering them after a wasted weekend.
Failure 1: skipping primer entirely. The most common mistake. The reasoning is plausible — two topcoats will surely cover any wall — and the result is what Five Star Painting documents directly: "dark paint pigments can bleed through even several layers of topcoat, resulting in a patchy, unprofessional finish." Red and navy walls especially are prone to showing pinkish or bluish patches days after the topcoat dries. The trade-recommended alternative if primer is genuinely unavailable: "Apply multiple (potentially 3–4) thin, even coats of high-quality paint." Three to four coats without primer often still produces patchy results, where two coats over tinted primer produces clean ones. The fix after the failure is more expensive than doing it right the first time: clean the wall, apply two coats of tinted primer over the partially-covered topcoat, then two more topcoats — a total of six or seven coats instead of the original four.
Failure 2: white primer in one coat over a very dark base. A single coat of plain white primer over navy or black doesn't fully hide the base. The topcoat then sits on a muddy gray-pink surface rather than a clean white one, and ends up doing more chromatic lifting than it can handle in two coats. Bob Vila's framing: "Primer is a must when making dramatic wall color transitions from dark to light. Without it, the dark color may continue to peek through even after three or more coats of paint." The fix is Bob Vila's "two thin coats" recommendation — or better, use tinted primer in the first place.
Failure 3: primer tinted darker than the topcoat. Counter staff sometimes interpret a tint request loosely and tint the primer to the full topcoat color. This violates KILZ's manufacturer rule directly: "It is recommended to tint to a lighter shade than the topcoat color." When the primer ends up darker than the topcoat, the primer's sealing function degrades and the topcoat takes on extra chromatic work. The result is the opposite of the goal — more coats needed, not fewer. The fix: always specify a percentage (Bob Vila's 50% ceiling) or a specific P-code rather than asking for "the same color"; and check the primer can lid before leaving the store.
Failure 4: ignoring the recoat window. Each coat needs the manufacturer's specified recoat time to set properly. Glidden's general guidance for typical latex is safe recoat at four hours; high humidity extends that. Recoating too soon — within an hour or two — risks lifting the wet underlying coat, leaving streak marks, or producing an uneven sheen. The fix is patience. Pad the recoat window on humid days. Ventilate the room, run a dehumidifier if available, and accept that the day's work is the day's work — there is no shortcut to dry time.
Time and Cost: With vs Without Tinted Primer
For a standard twelve-by-twelve foot (3.7 by 3.7 m) bedroom with nine-foot (2.7 m) ceilings — about 350 sq ft of paintable wall area after doors and windows — the four approaches compare as follows. Coat application time is roughly one to two hours per coat regardless of approach; the four-hour recoat window between coats is the larger variable in total elapsed time.
| Approach | Coat sequence | Total coats | Elapsed time (recoat windows) | Paint usage |
|---|---|---|---|---|
| No primer (worst case) | 4-5 topcoats | 4-5 | 16-20 hr ≈ 2-3 days | 4-5 gal |
| White primer (1 coat) + topcoats | 1 primer + 2-3 topcoat | 3-4 | 12-16 hr ≈ 1.5-2 days | 3-4 gal |
| Tinted primer (2 coats) + topcoats | 2 primer + 2 topcoat | 3-4 | 12 hr ≈ 1.5 days | 2-3 gal |
| SW Color Prime gray (1 coat) + topcoats | 1 primer + 2 topcoat | 3 | 8 hr ≈ 1 day | 2 gal |
The two approaches that involve actually using primer correctly — tinted primer in two coats, or SW's gray-primer system in one coat — both land in the 1 to 1.5-day zone with two to three gallons of paint. The no-primer marathon eats two to three days and four to five gallons for a similar-sized room, often with patchy results that need a redo anyway.
The material savings are real but secondary. A mid-range gallon of interior paint runs roughly $40-50; the difference between five gallons (no primer marathon) and two gallons (correct tinted primer approach) is $120-150 in paint alone, plus the cost of additional brushes, rollers, drop cloths, and the time itself. The bigger gain is half the elapsed time and a finished wall that won't redevelop pigment patches the following week.
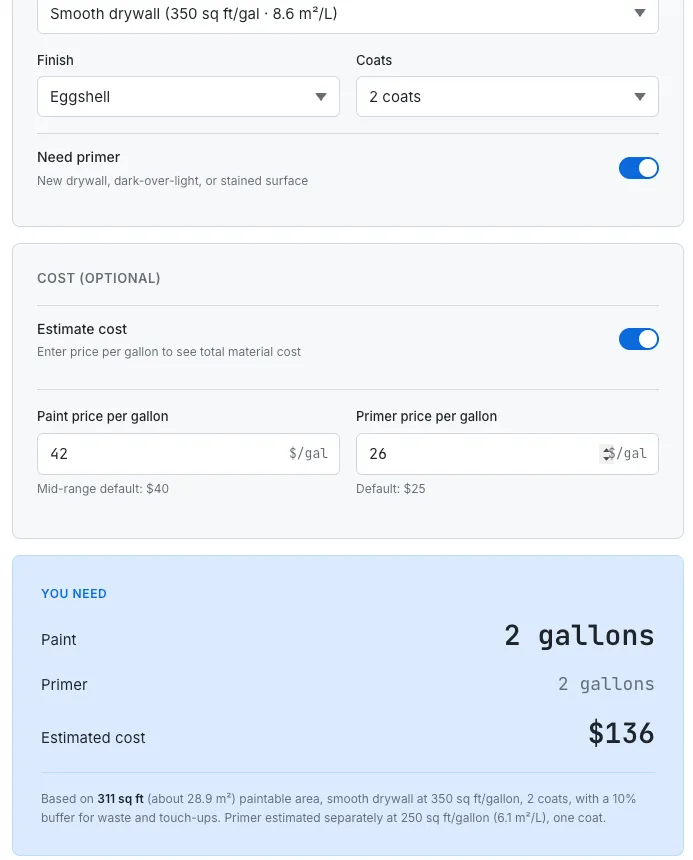
The calculator handles primer and topcoat gallons as separate line items — useful for the dark-to-light transition where the primer is doing chromatic work the topcoat would otherwise need to do.
The math layered above is what the calculator runs in the background. The starting point is the wall area; surface type sets the per-gallon coverage; the coat count multiplies; the 10% industry buffer rounds up to whole gallons. Pair this with our coats of paint guide for the general decision on coat count and the paint coverage per gallon guide for why the manufacturer's headline 350-400 sq ft figure doesn't apply directly to real walls. For metric units, the unit converter handles square feet to square meters and gallons to liters.
The honest summary on how to paint over dark walls: it's a sequencing problem more than a paint-quality problem. Tinted primer in two thin coats, the four-hour recoat window respected, two topcoats over the top, and the dark wall is gone — without the five-coat marathon, the patchy week-later regret, or the extra two gallons of paint sitting in the garage.
This is a general home-improvement guide based on industry consensus and major manufacturer documentation. Specific recoat times, tinting ceilings, and primer compatibility vary by product line — the authoritative source for any specific paint or primer is the manufacturer's product data sheet or the can label. Lead-based paint encapsulation, active mold remediation, and significant structural damage fall outside the scope of standard dark-to-light coverage; for those, consult a licensed contractor.
- Bob Vila — How Many Coats of Primer Do You Need? Verbatim source for the 50% tinting ceiling, the dramatic-changes framing, the two-thin-coats recommendation for dark-to-light, and the dark-color peek-through warning.
- Sherwin-Williams — Color Prime: What Color Primer to Use. Verbatim source for the P1-P6 gray continuum, the 20%-of-the-color-line scope, the light-absorption-and-scattering mechanism, and the contractor's three-coats-to-two-coats result.
- KILZ — Learn more about when and how to tint primer. Verbatim manufacturer guidance on lighter-than-topcoat tinting and the darker-to-lighter use case.
- Five Star Painting — Difficult Colors to Paint Over (and how to beat them!) Trade-painter reference for the difficult-color taxonomy (red, black, dark greens, blues), the bleed-through mechanism by color family, and the three-to-four-coats-without-primer estimate.
- Diebold (2004) — Titanium dioxide as the dominant opacifier in coatings, hosted by the American Coatings Association. Reference source for rutile-phase TiO2 refractive index in coatings literature.
- RW Pro Painting — Why Pro Painters Use Two Coats of Paint. Industry-painter reference for the 1.5-mil single-coat and 3-4-mil two-coat dry film thickness math underlying the manufacturer's two-coat standard.
- Glidden — How Long Does Paint Take to Dry and Cure? Manufacturer guidance for the four-hour latex recoat window.
- SudoTool — How Many Coats of Paint Do You Really Need? Sister blog with the general coat-decision matrix.
- SudoTool — Paint Coverage per Gallon: The Real Number. Sister blog with the coverage-formula breakdown.
- SudoTool — Eggshell vs Satin vs Semi-Gloss: How to Choose. Sister blog on finish choice and cleanability.