How Many Coats of Paint Do You Really Need?
Manufacturer "one-coat coverage" claims assume ideal conditions — smooth, properly primed surface, applied by a pro, in good environmental conditions. Real walls have texture, real-world painting takes two coats, and your kitchen or bathroom needs two minimum regardless. Here is the honest decision matrix, backed by manufacturer documentation and the actual science of paint hide.
How many coats of paint do you need? Almost always two. The exceptions are narrower than the paint can label suggests, and the reason is mechanical rather than aesthetic: paint is engineered to reach a specific dry film thickness for full performance, and a single coat usually delivers only about half of it. The second coat brings the film up to depth — which is where the paint's hide, durability, and washability actually live.
This guide walks through the decision in six parts: the situation-by-situation matrix, the chemistry that explains why one coat falls short, the tinted-primer trick that collapses long sequences when moving from dark to light, how wall texture changes the coat math, how paint finish trades coverage for cleanability, and the practical setup — drying time, tools, and touch-up technique — that determines whether your two coats actually deliver.
How Many Coats of Paint Each Scenario Actually Needs
Paint coverage debates collapse into a small number of real scenarios. The matrix below maps each to its actual coat count. The most common mistake is taking the paint can label literally — "one-coat coverage" assumes a smooth, properly primed surface applied at the manufacturer's exact spread rate. Real walls are textured, real painting takes two coats, and the exceptions are narrow.
| Scenario | Primer | Paint coats | Why |
|---|---|---|---|
| Same color over same color (touch-up) | 0 | 1 | Existing layer is the base; only filling minor wear |
| Light color over similar light color | 0 | 2 | Manufacturer-intended dry film thickness |
| Light color over dark color (with gray tinted primer) | 1-2 (tinted gray) | 1-2 | Tinted primer collapses the sequence by 1-2 coats |
| Light color over dark color (no tinted primer) | 0 | 3+ | Brute-force approach; time- and material-expensive |
| Dark color over light color | 0 | 2-3 | Dark pigments hide more easily, but uneven coverage shows faster |
| New drywall | 1-2 (PVA primer) | 2 | Drywall paper and joint compound absorb paint unevenly |
| Bare wood | 1-2 (oil-based primer) | 2 | Grain swelling; oil-based primer fills and seals |
| Kitchen / bathroom / high-traffic | 0 (if existing wall) | 2 minimum | Builds film thickness for washability and durability |
| Exterior (siding, trim) | 1 (if bare wood) | 2 | Weather exposure requires full film thickness |
| Ceiling | 0 | 1-2 | Flat ceilings reflect less light; one coat sometimes acceptable |
Same-color touch-ups can succeed with a single coat, but the conditions are stricter than they sound. Use the same tool that originally applied the paint — rolled walls stay rolled; sprayed cabinets stay sprayed. Use paint from the same can or batch — colors drift slightly between manufactured batches, even for the same product code. Limit the touch-up to small areas with minor wear. Fresh paint over aged paint usually reads slightly brighter, with a different tone, which makes touch-ups visible against the surrounding wall. Keep a labeled container of the original paint for future touch-ups; matching a wall color from a fresh can months or years later is unreliable. For anything past a small scuff, plan on two coats across the whole wall.
Why One Coat Often Isn't Enough: The DFT and Hide Story
The mechanics are straightforward. Every interior paint is engineered to reach a specific film thickness when fully dry — generally 3 to 4 mils (75 to 100 micrometers) for residential and light-commercial applications. Industry painter documentation puts the math directly: a single coat applied at the manufacturer's recommended spread rate produces about 1.5 mils of dry film, and two coats reach the full 3-4 mil range (RW Pro Painting; Oak Cliff Painting). The second coat is not a luxury; it brings the film up to the depth where the paint's full performance — hide, durability, washability, color depth — actually lives.
The "hide" part of the equation comes from pigment chemistry. The primary opacifier in modern white and light paints is titanium dioxide (TiO₂), which has the highest refractive index of any commonly used white pigment — the rutile crystal phase used in coatings is typically cited around 2.6 to 2.7 in coatings literature (Diebold 2004). TiO₂ particles scatter light inside the paint film, preventing it from reaching the substrate underneath. The higher the TiO₂ concentration and the more optimized the particle size, the better the paint hides what is below. This is why pure whites and pale neutrals tend to cover well: they are loaded with TiO₂.
The flipside explains why bright yellows, deep reds, and extra-vibrant colors need three or four coats. General Finishes puts it directly: "Extra deep and extra bright colors have lower opacity because they start out in a 'clear' base which contains only calcium carbonate. Very little titanium dioxide is added to a bright paint formula to help keep these colors vibrant." The result is a beautiful color with much less hiding power. The mechanism is not a defect; it is the only way to get certain colors. The price is more coats. At the opposite extreme, very dark colors hide well in fewer coats — they absorb most of the light that hits them rather than scattering it back through the film.
The warranty layer matters too. Industry painter consensus is that premium product lines — Sherwin-Williams Emerald, Benjamin Moore Aura, PPG Timeless — are formulated to reach full dry film thickness only after two coats, and that manufacturer warranties typically require "two coats applied at the proper spread rate and curing conditions" (RW Pro Painting). Specific warranty terms vary by product; the product data sheet on the can or the manufacturer's website is the authoritative source for your exact paint. When the front label says "one coat coverage," the spec sheet usually says two.
Painting Over Dark Colors: Where Tinted Primer Saves a Coat (or Three)
The brute-force approach to covering dark walls with a light color is painful. Two coats of primer, followed by two to three coats of the new color, is the baseline path — four or five coats of work, two to three days of dry time, and roughly twice the paint you would otherwise need. The dark base keeps fighting back through each subsequent layer until the cumulative pigment finally outweighs it.
The trick the painter community has settled on is tinted gray primer. Instead of starting from a stark white primer (which the dark wall fights through), you ask the paint store to tint your primer with a gray colorant — or, in more sophisticated approaches, with a lighter shade of the final topcoat color. The gray neutralizes the chromatic influence of the dark base, and the topcoat lands on something close to its intended color in a single finishing coat.
Bob Vila's primer guide recommends two thin coats of either a white primer or a tinted primer that matches the new paint hue for dark-to-light transitions: "Two primer coats are recommended in this scenario because much of the first primer coat will be soaked up by the wall." With a tinted primer, the total sequence drops from five coats to two or three — one or two tinted primer coats and one or two finishing coats. The time savings are larger than the math suggests, because each coat needs roughly four hours of drying time on its own.
The reverse case — dark color over a light wall — is much easier. Dark pigments absorb light rather than reflecting it, so they hide the base layer more efficiently. Two coats usually do it, though uneven application shows up faster on a dark wall than a light one. Spread rate discipline matters more when the contrast can highlight every roller mark.
Surface Texture Changes the Coat Count
Wall texture rarely changes the number of coats — it almost always stays at two — but it changes how much paint each coat consumes and how reliably each coat hides what is underneath. The figures below are industry estimates calibrated to the dataset our paint coverage calculator uses; they reflect typical contractor benchmarks rather than a single manufacturer specification:
| Surface | Per gallon | Per liter |
|---|---|---|
| Smooth drywall | 350 sq ft | 8.6 m² |
| Orange peel texture | 300 sq ft | 7.4 m² |
| Knockdown texture | 275 sq ft | 6.7 m² |
| Popcorn texture (ceilings) | 225 sq ft | 5.5 m² |
| New unprimed drywall | 250 sq ft | 6.1 m² |
| Stucco or brick | 175 sq ft | 4.3 m² |
The reason is geometry. A popcorn ceiling has roughly 1.5 times the actual surface area of a smooth ceiling of the same flat dimensions — every popcorn bump is a small piece of additional surface that needs to be coated. The paint can label can't predict your wall texture, so it states the ideal-case number. The honest math sits in the table above and in the calculator, which adjusts coverage rates by surface type and applies a 10% buffer for waste and touch-ups.
The coat count usually stays at two even on textured surfaces — the question shifts to how much paint each of those two coats needs. The exception is bare or unprimed texture: a popcorn ceiling that has never been painted, or a freshly applied knockdown. Porous texture absorbs unevenly enough that a primer coat is almost mandatory before the two finishing coats.
Finish Sheen Trades Coverage for Cleanability
Paint finish — the sheen — is a coverage trade-off. Flat (or matte) finish reflects the least light, which means imperfections in the wall and slight variations in coat thickness disappear. The same property makes flat the hardest to clean — there is no smooth glossy layer to wipe; aggressive scrubbing actually removes some of the paint. Sherwin-Williams' official sheen guide recommends flat finish for ceilings (no traffic, no cleaning needed).
Semi-gloss is the opposite end. It reflects substantial light, so every uneven brush stroke and roller mark shows. Manufacturers compensate by recommending two coats minimum and meticulous prep. The payoff is washability — semi-gloss survives kitchen splatter, bathroom moisture, and the wipe-down a fingerprinted wall needs. Sherwin-Williams' guidance: "Choose semi-gloss for easy cleaning" for kitchens, and for bathrooms, "a satin or semi-gloss sheen is ideal, as it can withstand moisture."
Eggshell and satin sit in between — multi-purpose interior finishes that balance reasonable hide with cleanability for living rooms, hallways, and bedrooms that see normal use. Sherwin-Williams: "Satin or eggshell works well to balance elegance and practicality" for living and dining rooms, and for bedrooms, "a soft, calming feel can be achieved with eggshell or satin." Trim and cabinets get the opposite treatment: "high-gloss for a striking finish," where the durability and washability of a glossy surface matter more than hiding minor imperfections. For the full comparison and per-room decision tree, see our eggshell vs satin vs semi-gloss guide.
The high-traffic exception cuts across all of this: kitchens, bathrooms, and high-use spaces always get two coats minimum, regardless of color or sheen. Painter industry guidance puts it directly: "Apply at least two coats, waiting 2-3 hours between applications. The first coat covers, while the second adds protection and evenness." The first coat covers; the second builds the film thickness that daily wear and moisture demand.
The Practical Setup: Dry Time, Tools, and Touch-Ups
The two-coat decision is the strategy. The execution is what determines whether the coats actually deliver their full performance. Two practical layers matter: the time between coats and the consistency of your application.
Drying time. Standard latex (water-based) paint is dry to the touch within an hour and safe to recoat in roughly four hours, under what Glidden describes as normal conditions: "dry to the touch in about one hour, and you can safely recoat in four hours." Bob Vila sets the environmental range — "apply in temperatures between 50 and 85 degrees Fahrenheit" (10-29°C), with "rooms with 50 percent humidity or lower for the fastest drying time." Real conditions rarely match the lab. High humidity slows evaporation; painting a bathroom or a basement in summer means padding the four-hour window into the late afternoon. Cold rooms slow the chemistry further — below 50°F, latex paint can take a day or longer to recoat safely. The paint can label has the manufacturer-recommended window; trust it for normal conditions and pad it generously for humid or cold rooms.
Tool consistency. Touch-ups and follow-up coats need to use the same application method as the original work. A wall originally rolled looks visibly different if you try to touch it up with a brush — the roller leaves a fine texture (stipple) the brush cannot match. Same for spray work: any spot you brush in afterward stands out. The other consistency rule is paint batch: paint colors drift slightly between manufactured batches, even for the same product code. Save a labeled container of the original paint for future touch-ups; matching wall color from a fresh can years later is unreliable.
Once you have decided on the coats and the finish, the next question is how much paint to actually buy. The calculator does the room-by-room math:
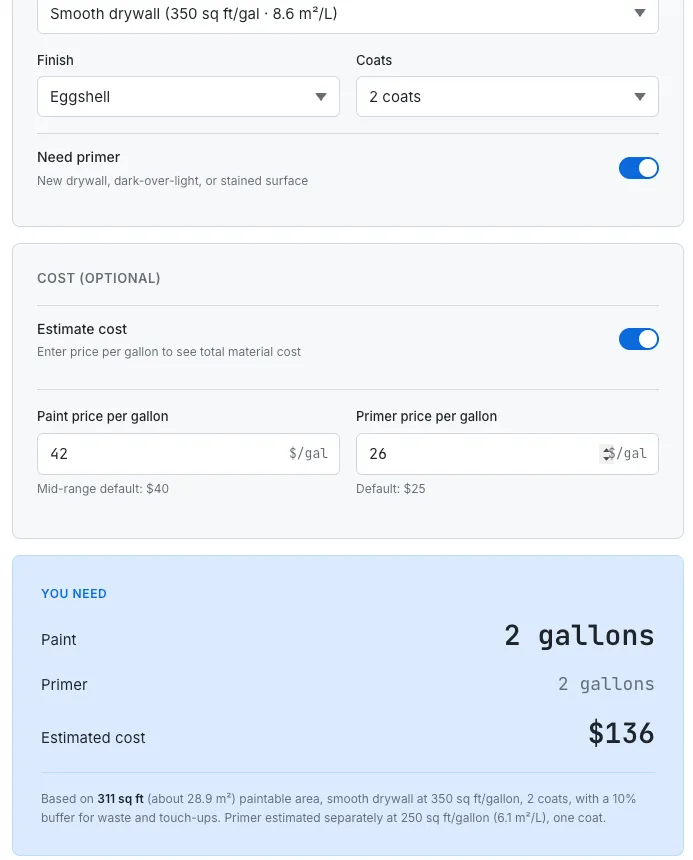
SudoTool's Paint Coverage Calculator — dual-unit display (sq ft and m², gallons and liters), 10% buffer baked into the result, primer estimated separately.
The calculator handles the inputs that depend on the decisions in this guide — number of coats, surface type, finish (which affects coats indirectly), primer toggle — and applies the 10% buffer that industry painters generally recommend for waste, roller absorption, cut-in overlap, and touch-up reserve. Output is shown in both imperial (gallons) and metric (liters), and the cost estimate is optional — toggle it off if you only want the volume figure. For converting room measurements between unit systems, the unit converter handles square feet, square meters, and any other measurement pair.
Frequently Asked Questions
How many coats of paint do I need over new drywall?
New drywall needs one to two coats of PVA primer followed by two coats of paint. The drywall paper and joint compound absorb paint unevenly, so the primer seals the surface and the two finish coats build the full dry film thickness.
Is one coat of paint ever enough?
Only for a same-color, same-sheen touch-up applied with the same tool and ideally paint from the same batch. Fresh paint over aged paint reads slightly brighter, so for anything past a small scuff, plan on two coats across the whole wall.
How many coats does it take to cover a dark wall with a light color?
Without help, expect three or more coats. A gray tinted primer is the fix — it neutralizes the dark base so the topcoat lands near its true color, cutting a four- or five-coat marathon down to two or three total coats.
Why do bright colors need more coats?
Bright reds, yellows, and saturated colors start in a near-clear base with very little titanium dioxide, the pigment that gives paint its hiding power. With less opacifier, the color stays vibrant but covers poorly, so it often needs three or four coats.
How long should I wait between coats of paint?
Standard latex paint is dry to the touch in about one hour and safe to recoat in roughly four hours under normal conditions — 50 to 85°F and under 50% humidity. High humidity or rooms below 50°F slow drying and need a longer wait.
Do kitchens and bathrooms need two coats?
Yes. Kitchens, bathrooms, and high-traffic spaces always get two coats minimum, regardless of color or sheen. The first coat covers and the second builds the film thickness that daily wear, moisture, and frequent wipe-downs demand.
This is a general home-improvement guide based on industry consensus and major manufacturer documentation (Sherwin-Williams, Benjamin Moore, KILZ, Bob Vila, painting contractors). Coverage and coat recommendations vary by product line — always check your specific paint can label, which is the authoritative source for that exact formula. For projects involving lead paint encapsulation, mold remediation, or structural surface repair, consult a licensed contractor; those are outside the scope of standard coat-count guidance.
- RW Pro Painting — How Pro Painters Use 2 Coats of Paint for Perfect Coverage. Industry source for the DFT 1.5 mils single / 3-4 mils two-coat math and warranty framing.
- Oak Cliff Painting — 2 Coats of Paint: Do You Really Need It for Perfect Finish? Cross-confirmation of the DFT 3-4 mils figure.
- Diebold, M.P. (2004). Titanium Dioxide — The Most Opaque of All White Pigments. CoatingsTech, January 2004. Authoritative source for TiO₂ as primary opacifier and refractive-index framing.
- General Finishes — Why Does Bright & White Paint Take So Many Coats? Source for the clear-base / calcium-carbonate framing of bright colors.
- Bob Vila — This Is How Many Coats of Primer You Need for the Perfect Paint Job. Source for "two primer coats" on unfinished drywall and tinted primer guidance.
- Bob Vila — How Long Does It Take Paint to Dry? Source for the 50-85°F / under 50% humidity environmental range.
- Glidden — How Long Does Paint Take to Dry & Cure? Source for the 4-hour latex recoat window.
- Sherwin-Williams — How to Choose Paint Finishes. Official source for the kitchen / bathroom / bedroom / living / trim sheen recommendations.
- Benjamin Moore — How to Choose a Paint Finish. Cross-reference for sheen guidance.
- PainterNearMe — Choosing Durable Paints for High-Traffic Areas. Source for the "two coats minimum, 2-3 hours between applications" guidance for kitchens and bathrooms.
- Family Handyman — Eggshell vs. Satin Paint: What's the Difference? Reference for sheen comparison.
- Hartzell Painting — When One Coat of Paint Is Enough & When It's a Costly Mistake. Reference for the narrow conditions under which one coat is sufficient.
- CalcForHomes — Waste Factor Guide. Source for the 10% industry-standard waste buffer for brush and roller painting.