Why I Built a Browser-Based Image Compressor When Free Ones Already Exist
Free compressor sites have usage limits, skip WebP, and store your files on their servers. So I built my own.
If you build websites or make YouTube videos, you already know: reaching for an image compressor is one of those tasks that never stops coming back. A thumbnail for a blog post, a banner for a video, a screenshot that needs to be under 2 MB before you can upload it somewhere. It's not hard work, but it happens often enough that the tool you use for it actually matters.
For a long time I just searched for "image compressor free" and used whatever came up first. Most of them work fine — until they don't.
The Problem with Free Image Compressor Sites
There are dozens of free image compression sites. I've probably tried ten or fifteen over the years. Most of them do the basic job well enough, but they all share the same set of small frustrations that add up over time.
Usage limits. Some sites let you compress five images for free, then ask you to sign up or pay. That's fine if you're compressing one photo for a profile picture. But when I'm writing a blog post with six screenshots and a cover image, I hit the limit before I'm halfway through. At that point I'm either waiting for the daily reset, opening a second site in another tab, or just giving up and uploading oversized images.
No WebP support. WebP has been the recommended image format for the web for years now. It's supported by every modern browser. A typical JPEG shrinks by another 25–35% when converted to WebP with no visible quality loss. But a surprising number of free compressor sites still only handle JPEG and PNG. If I want WebP, I need a separate converter — which means another site, another upload, another download.
Privacy concerns. This is the one that bothered me most. To compress an image on these sites, you upload it to their server. The server processes it and sends back the result. Sounds straightforward, but it means your file is sitting on someone else's machine for some amount of time. Maybe they delete it immediately. Maybe they don't. There's no way to know for sure. For personal photos it feels a little uncomfortable. For unreleased screenshots of a project I'm working on, it feels worse.
None of these problems are deal-breakers on their own. But when you're compressing images every week, the friction adds up. I started thinking about what it would take to just build my own.
What I Actually Needed
Before writing any code, I listed out what the tool had to do. The list turned out to be pretty short:
- Support JPEG, PNG, and WebP — both as input and output, with easy conversion between them
- Show a before-and-after comparison so I can see exactly how much quality I'm losing
- Let me set a target file size and automatically find the right compression level
- Never upload anything to a server — everything happens in the browser
The last point was non-negotiable. If I'm building this myself, the whole reason is to avoid sending my files to someone else's server. The compression has to happen locally, in the browser, with no network requests involved.
How It Works: HTML Canvas Does the Heavy Lifting
The key insight is that browsers already know how to compress images. The HTML5 Canvas API has a method called toBlob() that takes a canvas, an output format, and a quality parameter, and produces a compressed image file. No external library needed. No API call. Just the browser doing what it already knows how to do.
The Image Compressor loads your image into a canvas element, optionally resizes it to a maximum width you specify, and then exports it in your chosen format at the quality level you set. The whole process takes milliseconds for a typical photo. Since nothing leaves your browser, it works even if you disconnect from the internet after loading the page.
For the target file size feature, the tool runs a binary search over quality values. It tries quality 50, checks if the result is under your target, then goes up or down accordingly. After six or seven iterations it converges on the highest quality that fits your target size — usually in under a second. It's the kind of thing that would feel overengineered as a server feature, but in the browser it's practically free.
Seeing the Difference Before You Download
The hardest part of image compression isn't the compression itself — it's deciding how much compression is acceptable. Drop the quality from 80% to 40% and the file gets much smaller, but at some point the image starts looking noticeably worse. The problem is that "noticeably worse" is subjective and depends on the image.
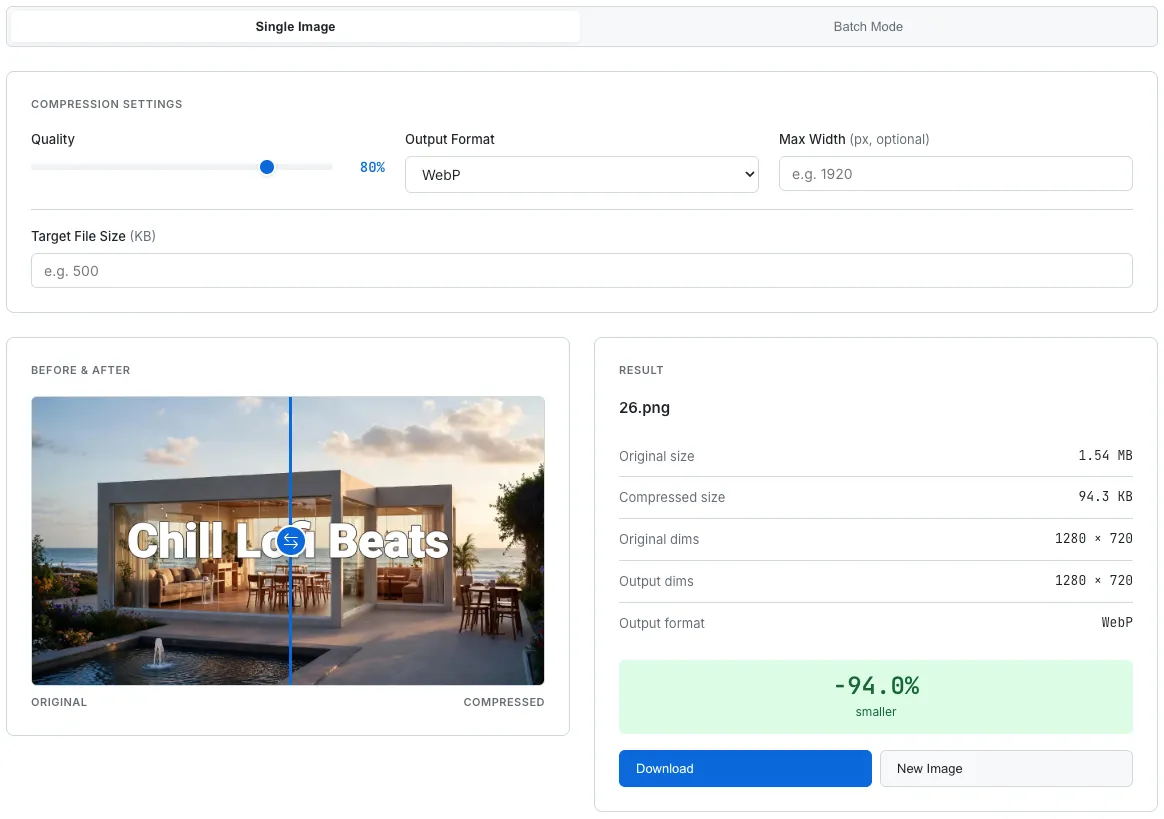
A 1.54 MB PNG compressed to 94.3 KB WebP — 94% smaller. The comparison slider lets you check if that trade-off is worth it.
That's why the tool includes a visual comparison slider. In single image mode, you see the original on the left and the compressed version on the right, with a draggable blue divider in the middle. Slide it left to see more of the compressed image; slide it right to see more of the original. It takes the guesswork out of "is 60% quality good enough?" — you can just look.
This turned out to be the feature I use the most. I'll set the quality to 80%, glance at the comparison, then try 60% and check again. Within a few seconds I know exactly where the sweet spot is for that particular image. Numbers alone can't tell you that. Your eyes can.
Batch Mode for the Busy Days
Sometimes I need to compress one image. Other times I'm preparing a blog post and have eight screenshots to process. Doing them one at a time would be tedious, so there's a batch mode. Switch the tab at the top, drag in all your files at once, and they're all compressed with the same settings. You can download them individually or all at once.
Each image in the batch shows the original size, compressed size, dimensions, and how much space was saved. If one image in the batch grew larger instead of smaller — which can happen when you try to compress a PNG that's already highly optimized — it's flagged in yellow so you notice immediately.
No Server, No Account, No Limits
The whole tool is a single HTML page with some CSS and JavaScript. No backend. No database. No API keys. No user accounts. There's nothing to sign up for and nothing to pay for, because there's no infrastructure cost beyond hosting a static file.
More importantly, there's no usage limit. Compress one image or a hundred — it makes no difference, because the work is happening on your machine, not mine. And since your images never leave your device, privacy isn't something you have to trust me on. It's just how the tool works. You can verify it yourself by opening the network tab in your browser's dev tools while compressing an image. You'll see zero outgoing requests.
This is the same philosophy behind every tool on SudoTool. The Travel Currency Converter stores your preferences in localStorage instead of a server database. The Running Weather Scheduler saves your city and run time locally. The pattern is always the same: if the data can stay on your device, it stays on your device.
Try It Yourself
The tool is free, works on desktop and mobile, and requires no sign-up. Drop in an image, adjust the quality, compare the result, and download. If you work with images regularly — for a website, a blog, a YouTube channel, or anything else — it should save you a few minutes every time.
If you want smaller files with the best compatibility, try converting to WebP at 75–80% quality. For most photographs, the difference is invisible to the eye — but the file size drops dramatically. The comparison slider is there to confirm it.